Share this topic on AskShare this topic on DiggShare this topic on FacebookShare this topic on GoogleShare this topic on TwitterShare this topic on YahooShare this topic on Google buzz

Author Topic: Sig Rotator - No GAP required!  (Read 11667 times)

0 Members and 1 Guest are viewing this topic.

Offline fencepost

  • Member
  • **
  • Posts: 2,626
  • Karma: 0
    • fence-post.deviantart.com
Sig Rotator - No GAP required!
« on: July 03, 2006, 06:19:00 PM »
Hello, everyone!  In today's lesson, I'll teach you how to create a sig rotator in just a few easy steps.  In fact, it's so easy, you'll be wondering why you didn't think of it before.  Here's what we'll be making:


This tutorial is written so that even a noob can see some quick results!  I'll be referring to the layer's dialog window quite a bit.  This window shows the order of your layers and allows you to set the blend mode of the layers (as well as other things).  If you don't have the layer's dialog window open (or don't know how to open it), go to the Dialogs menu, choose Create New Dock, and then select Layers, Channels & Paths.  From here on out, any menus like that will be shown as follows:  Dialogs | Create New Dock | Layers, Channels & Paths.  This will help cut down on typing.

Step 1:


Open up the sig you want to animate (File | Open)
Then add the next sig to the first one (File | Open as Layer....) (Your sigs really need to be the same size.  You advanced users will know how to get around that, but my tutorial is not covering that right now.)

If you want to experiment with my images, you're more than welcome to....Just right click on each image and save them to your hard drive.

Look at this image of the layer's dialog window (I've highlighted the tab in red).


Notice that I have some text next to each layer.  You can manually enter comments here as you're working on your images.  For animations, GIMP assigns 3 things: layer name, amount of time that the frame is shown, and how the frame is handled. 

Step 2:

Double click on the layer name and fill in your layers just as I have.  I've called mine Sig 1 (Name), 150ms (time the frame is shown in milliseconds.  In this particular instance its 150 ms.), and replace (This tells GIMP that this frame will completely replace the frame below it.  GIMP also uses "combine", but we're not covering that right now.)  Make sure the Time and Frame handling operators are in parenthesis.

The purpose for doing this step now, is to keep you from worrying about it when you're gonna save the animation.

Step 3:

Make 4 duplicates of each Sig Layer.  You do this by clicking on the highlighting the layer and clicking on the Duplicate Layer button at the bottom of the layer's dialog window.  Which looks like this....


Click on the button 4 times for sig 1 and then highlight the sig 2 layer and click on the Duplicate layer Button 4 times for it. You should now have a total of 10 layers.  Organize them like so....


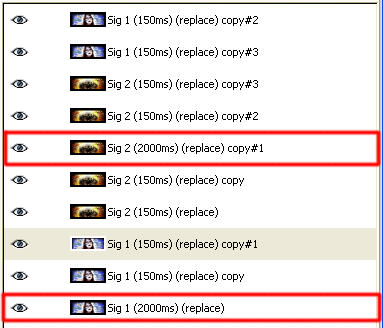
Don't worry about the order of the "layer names".  Just make sure you have them ordered from bottom to top: 3 of sig 1, 5 of sig 2, and 2 of sig 1.  Notice that layers 1 and 6 have had their times changed.  You have to do this manually.  Just double-click on the layer name and change the time form 150 to 2000.  This causes GIMP to pause on these 2 frames for 2000 ms or 2 seconds.  The smaller the number, the quicker the frame will move on to the next one.

Step 4

Now let's turn these little buggers!

Highlight your second layer from the bottom.
Now, go to Filters | Map | Map Object and the following window will appear:


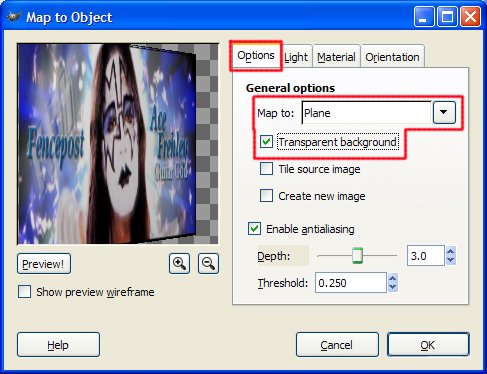
I don't know why the GIMP window distorts the image, but the outcome will not be stretched like this. 

At any rate, set the settings just as I have here.  (You can experiment with the other parameters later.  For now, just follow along).  Make sure you select Transparent Background under the Options tab or you won't like the results.

Now, we're gonna do the same thing for each layer.  Rather than detail every step and show screenshots, I'll explain with text only. 

Select the next layer up.
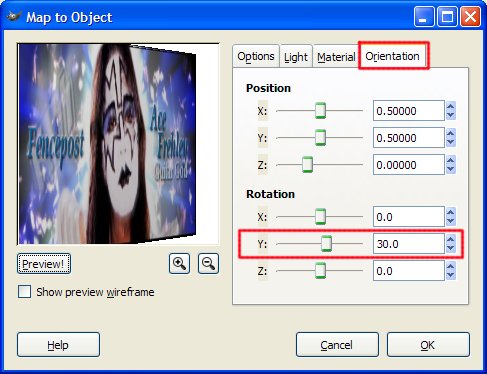
Go to Filters | Map | Map Object (or Shift+Ctrl+F.  This will bring up the options for the last filter used).  Go to the Orientation tab. 

Change the Y value to 60.

If you've followed along exactly, the next layer in the stack will be Sig 2. 
Highlight it.  Go to Filters | Map | Map Object (Shift+Ctrl+F).  Go to the Orientation tab.  Change the Y value to -60.
Select the next layer up. Go to Filters | Map | Map Object (Shift+Ctrl+F).  Go to the Orientation tab.  Change the Y value to -30.

Leave the next layer alone.  Don't change anything.

Skip to your next layer up.  Go to Filters | Map | Map Object (Shift+Ctrl+F).  Go to the Orientation tab.  Change the Y value to 30.
Go to the next layer.  Go to Filters | Map | Map Object (Shift+Ctrl+F).  Go to the Orientation tab.  Change the Y value to 60.
Go to the next layer.  Go to Filters | Map | Map Object (Shift+Ctrl+F).  Go to the Orientation tab.  Change the Y value to -60.
Skip to your next layer up.  Go to Filters | Map | Map Object (Shift+Ctrl+F).  Go to the Orientation tab.  Change the Y value to -30.

You're now finished.  Check it over and see if you like the settings by going to Filters | Animation | Playback.  If you want to change any of the speed settings, remember you can double-click on a layer name in the layer's dialog window and change them there.

Once you're satisfied with your animation, go to Filters |Animation | Optimize (for gif).  This will help reduce the file size.  A new window will open up with your optimized animation.  Finally, go to File | Save As and give it any name you choose, but you have to add the .gif extension to the end.  When the next window opens, be sure you check the Save as Animation button and choose Export.  When the next window opens, don't change anything because you've already assigned the speed and frame handling operations earlier.  Just hit OK.  EDIT:  Optimization often creates an undesirable effect within the animation and doesn't always result in a smaller file size.  If this step doesn't produce the desired results, I recommend skipping it at this point.  You can always re-open the animation in GIMP, convert it back to RGB mode (Image > Mode > RGB), then convert it back to Indexed mode (Image > Mode > Indexed...) and reduce the number of colors and experiment with the dithering settings to try to get a smaller file size.

You are finished.  Again, here's my final product.


I've shown you mine, now you show me yours.

Well, I hope this has been fun for you and that you've learned a little bit more about GIMP.  Comments are always welcome.  Keep on GIMPing.

Art
« Last Edit: October 06, 2010, 10:56:46 PM by Hi-T3k~HillBilly »
I'd rate you as an upper-middle-lower-mod with pro-novice-inter tendencies.....and a twist of lime!  Of course, my rating scale is completely objectively subjective, but ALWAYS consistently inconsistent.

Offline Hi-T3k~HillBilly

  • Administrator
  • *****
  • Posts: 1,526
  • Karma: 0
    • hitech-hillbilly.deviantart.com
    • Facebook:jacob.c.dillon
    • hitek_hillbilly:imageshack
    • droz928: PhotoBucket
    • jcdillon28:twitter
    • HillBillyGFX
Re: Sig Rotator - No GAP required!
« Reply #1 on: July 03, 2006, 06:37:30 PM »
Sweet Fence thank you for sharing!

Man you are like the gimp anamation guru

Offline fencepost

  • Member
  • **
  • Posts: 2,626
  • Karma: 0
    • fence-post.deviantart.com
Re: Sig Rotator - No GAP required!
« Reply #2 on: July 03, 2006, 06:52:15 PM »
No, problem.  Don't forget tho, that I'm also the bestest sig maker ever! 
I'd rate you as an upper-middle-lower-mod with pro-novice-inter tendencies.....and a twist of lime!  Of course, my rating scale is completely objectively subjective, but ALWAYS consistently inconsistent.

Offline Darth_Gimp

  • Number One
  • *****
  • Posts: 2,892
  • Karma: 0
  • Faith, Folk, Family!
    • lds-jedi.deviantart.com
    • Odinic Rite
Re: Sig Rotator - No GAP required!
« Reply #3 on: July 03, 2006, 09:12:23 PM »
I'm going to see if I can apply what you have here... and push it to have it rotate to a third sig, but rotate vertically. 

Maybe not tonight though... My wife needs me. Dental pain, Penicillin and Tylenol 3... yeah she needs me.
« Last Edit: July 03, 2006, 09:51:52 PM by Darth_Gimp »
GimpDome Group: http://gimpdome.deviantart.com/
My DeviantArt: http://lds-jedi.deviantart.com/

There's no worse feeling than that millisecond you're sure you are going to die after leaning your chair back a little too far.

Offline fencepost

  • Member
  • **
  • Posts: 2,626
  • Karma: 0
    • fence-post.deviantart.com
Re: Sig Rotator - No GAP required!
« Reply #4 on: July 03, 2006, 09:29:10 PM »
Hope she gets to feeling better.  You could have stopped with dental pain and I would have known right away where you were goin' with that one. 
I'd rate you as an upper-middle-lower-mod with pro-novice-inter tendencies.....and a twist of lime!  Of course, my rating scale is completely objectively subjective, but ALWAYS consistently inconsistent.


Offline vnt87

  • Member
  • **
  • Posts: 6
  • Karma: 0
  • Hermit
    • Nam V
Re: Sig Rotator - No GAP required!
« Reply #5 on: July 04, 2006, 11:26:39 PM »
Amazing work as usual, Fence. Your tutorials always amaze me.
{insert dumb random quotes here}

Offline fencepost

  • Member
  • **
  • Posts: 2,626
  • Karma: 0
    • fence-post.deviantart.com
Re: Sig Rotator - No GAP required!
« Reply #6 on: July 05, 2006, 08:07:36 AM »
Thanks for the compliments!  I try to keep to bring a different approach to the tutorials so we're not always evaluating everything from a sig/avatar perspective.  Sometimes you may see a tutorial that I (or others) produce and can't find an immediate application to your own work. But later on, you remember that you saw something that now applies.  Hopefully, I can keep the creative juices flowing and continue to prepare more interesting tutorials. 

Art
I'd rate you as an upper-middle-lower-mod with pro-novice-inter tendencies.....and a twist of lime!  Of course, my rating scale is completely objectively subjective, but ALWAYS consistently inconsistent.

Offline gimpnub

  • Member
  • **
  • Posts: 149
  • Karma: 0
  • Oh no! I've been drafted for the GIMP Army...
Re: Sig Rotator - No GAP required!
« Reply #7 on: July 18, 2006, 10:55:14 AM »
this took me a while to align correctly but it is a smaller file and a better looking spin

DANGIT!! they all got screwed up except cloud!!

the link to the old and bad image: http://i81.photobucket.com/albums/j206/gimpnub/animated%20GIFs/cloud-rikumaru-yuna-vincent_box-spi.gif
~~~~~~~~~~~~~~~~~~~~~~~~~~~~~~~~~~~~~~~~~~~~~~~~~~~~~~~~~~~~~~~~~~~~

EDIT:

i fixed the file!!!!!! no more random white pixels!!!!


OOps i double posted the picture

~~~~~~~~~~~~~~~~~~~~~~~~~~~~~~~~~~~~~~~~~~~~~~~~~~~~~~~~~~~~~~~~~~~~

EDIT:

When i add another sig to this i will include the adjustments to the update
« Last Edit: July 18, 2006, 11:11:00 AM by gimpnub »

Offline fencepost

  • Member
  • **
  • Posts: 2,626
  • Karma: 0
    • fence-post.deviantart.com
Re: Sig Rotator - No GAP required!
« Reply #8 on: July 18, 2006, 11:46:30 AM »
Very nice!  Did you map it to a cube instead of a plane?  I really like it!
Posted on: July 18, 2006, 01:13:49 PM
I updated the post with an edit regarding optimization.
« Last Edit: July 18, 2006, 11:57:38 AM by fencepost »
I'd rate you as an upper-middle-lower-mod with pro-novice-inter tendencies.....and a twist of lime!  Of course, my rating scale is completely objectively subjective, but ALWAYS consistently inconsistent.

Offline gimpnub

  • Member
  • **
  • Posts: 149
  • Karma: 0
  • Oh no! I've been drafted for the GIMP Army...
Re: Sig Rotator - No GAP required!
« Reply #9 on: July 18, 2006, 11:49:58 AM »
nope still to a plane

ok here's how it kinda works:

lets say i'm shifting between sig A and sig B

**NOTE: If you are doing more than one rotation (you should be) to increase your efficiency,
after you finish step 1 (before moving on to step 2) click on each duplicate 1 and then Filters>Repeat Map Object. 
After step 2 (before 3) click on each duplicate 2 and then Filters>Repeat Map Object.\
After step 3 (before 4) click on each duplicate 3 and then Filters>Repeat Map Object.
After step 4 click on each duplicate 4 and then Filters>Repeat Map Object.***
***2nd Note: If you plan on adding more sigs to the object (like i do) don't do the a) steps, then save as .xcf, then merge, then save as .gif (if you wish to add more sig(s) to the object then u just open the xcf file and add the sig and the duplicates with the angles and positions)

1) map sigA (duplicate1) to a plane at 30 degrees and increase the position on the x axis (still in map object) so the right edge was on the image boundary.
2) then repeat those steps with 60 degrees on sigA (duplicate2).

3) now comes the experimental part: map sigB (duplicate3) to a plane at -60 degrees and decrease the position on the x axis until the right edge is coincidal (up against to the nearest pixel) with the left edge of the 30 degrees sigA, this can take many undos and re-show map objects.
3)a) then merge the -60 degrees sigB with the 30 degrees sigA. now your 3/4 of the way done with one rotation.

4) again very experimental here: map sigB (duplicate4) to a plane at -30 degrees and decrease the position on the x axis until the right edge is coincidal with the left edge of the 60 degrees sigA, again many undos and re-shows.
4)a) then merge the -30 degrees sigB with the 60 degrees sigA. now your done with one rotation.