EDIT: This tutorial has been modified from the original version. I have attempted to clarify some steps that may have created some confusion. I also reordered a couple of steps to simplifyIn this tutorial, we're going to simulate the blending techniques utlized by photoshop users in many of the signatures you've seen around the web. This certainly isn't the only way, but it is the first one we'll explore.
From here on out, there will be no more blah looking text on our signatures!
We'll make an image that has beautifully blended text. Like this:
1. Open up your favorite background or signature. I'll be using one I created for a signature a few days ago.
2. Grab your favorite font (I'm using Planet Kosmos, which is a fat font)
3. Write out your desired text in white.
4. Alpha select the text layer to select the outline of the text.
5. Invert the selection (Ctrl-i), which will select everything but the text.
6. Add a drop shadow (Script FU-->Shadow-->Drop Shadow) using the following settings:
X:2 ; Y:2 ; Blur 5 ; Color Black ; Opacity 80 ; Deselect "Allow Resizing"
As you can tell in this image, the shadow has been added to the inside of the font. This was accomplished by inverting the selection in step #5. It's probably not noticeable to you right now, but a shadow was also added to the outside of the layer on the right and bottom sides. We will correct this situation later.
7. Now add another drop shadow using the following settings:
X:1 ; Y:1 ; Blur 0 ; Color White ; Opacity 80 ; Deselect "Allow Resizing"
This will add a white edge to the upper left edges of the font. This step is not absolutely necessary, but when I was playing around with the different settings, I felt it created a really nice touch! Again, as in the last step, a shadow has also been added to the outside of the layer. This too will be corrected later.
This is where I changed the order of steps....8. Here we'll add a stroke to the text. This is how I do it:
- Add a new layer and move it below your text layer.
- Select the outline of the text by right-clicking the Text Layer in the Layer Dialog Window and choosing Alpha to Selection.
- Grow the selection by 1 or 2 pixels (I used a value of 1) - You can do this by going to the Select Menu and Choosing "Grow."
- Make the new layer active by clicking on the New Layer in the Layer Dialog Window (the selection will still be shown) and fill with black.
Your layers should now look something like this:
9. Now let's merge all the existing text layers.
- Make your top layer active as I've shown above.
- Select Layer | Merge Down
- Continue with Layer | Merge Down until all your text layers are made into 1 (one) layer.
10. Now add a little bevel to the main text:
Script FU-->Decor-->Add Bevel
Thickness: 5
11. Now, select the outline of the text layer (Alpha to Selection).
12. Add a drop shadow (Script FU-->Shadow-->Drop Shadow) using the following settings:
X:2 ; Y:2 ; Blur 5 ; Color Black ; Opacity 80 ; Deselect "Allow Resizing"
13. Now, select the top text layer and merge the text layers into 1 (one) layer (Layer | Merge Down)
14. Here's where we'll fix the shadows outside of the layer.
- Select the outline of the text layer (Alpha to Selection). This will select everything including the drop shadow. If you want to see what I'm talking about, grab your move tool (4-headed arrow) and move your text layer up and to the left. You'll see a white and a black drop shadow. We need to correct this just in case you decide you want your text in another location.
- Select Layer | Crop Layer. Now, move your layer again. There should be no more shadows outside of the layer.
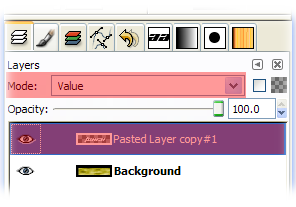
15. Adjust the blend mode of the layer to Multiply, Burn, Overlay, Value, or whatever looks good to you. I used Value.
This is my result:
You're Done!
Looks pretty good. Doesn't it?
We'll look at some other methods later.
Show me your results. As always, if you have any questions or need clarification, post it here.
Art


