I was asked sometime ago at gimptalk.com about creating a flash highlight over the edge of an axe using GIMP alone, no GAP. At first, the task seemed like it might be a little difficult, but it's really not, just a lot of repetitive steps. Instead of doing the tutorial for the axe, I decided to apply it to text, as this seems really popular and most people have a really difficult time doing the animated flash text tutorial using GAP.
To complete this tutorial you'll need to have some basic gimp skills, like creating new documents, working with gradients, adding new layers, etc. I will not be going over these basic steps. So without further ado, let's create this image:
 Step 1
Create your signature as you normally would, but leave out the text that you want to add the highlight to. In this case, I've left out my name: "Fencepost". If you want to follow along with me, I'll post the blank. But, I warn you, if you rip this and claim it as your own, I will find out about it and be all over you like white on rice! Here's the blank:
 Step 2
Now, add your text to it and get it just the way you want it.
Make sure your text is going to be a different color than the highlight. For example, don't use white text, with a white highlight. You won't be able to see it. Mine looks like this:

I've added a couple of highlights to the text to accent it a bit, but then merged all of the text layers together. At this point, you should have 2 layers: a background and a text layer.
Step 3Let make the highlight layer.
Add a new transparent layer to your image. Double-click your gradient tool and adjust your settings like so:
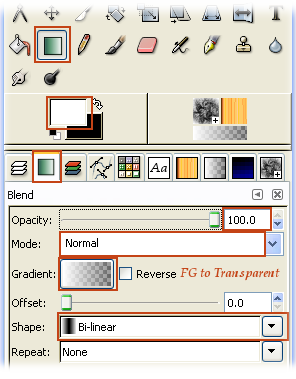
Now, with the gradient tool still selected, click anywhere on your image and drag the cursor for a little distance from left to right (or right-to-left). Here's a sample image showing how I made my highlight. I drug the cursor from the green dot to the red dot. (NOTE: The green/red dots are only for reference only. They will not show up on your screen). The more you drag, the wider your highlight will be. Experiment for yourself.

Now, you should have a total of 3 layers.
Now, let's work some magic!
Step 4- Take the move tool and position your highlight layer so that it just covers a little bit of the left side of your text.
- Now, set this layer's blend mode to "Screen" (Other blend modes will probably work, but just use Screen for now)
- Duplicate the highlight layer and reposition the duplicate so that it is just to the right of your first one. Since it's a duplicate, it's blend mode will already be set to Screen. Leave it there.
- Continue to do this until your text is covered, like so:

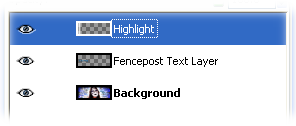
Here's what my layer's dialog window looks like now. I have a total of 9 layers (Background, Text Layer, 7 Highlight Layers). You may have more or less depending on how big your highlights are and how far you spaced them out, etc.
 Step 5
This is a very important step. So, please make sure you follow it or you'll have problems with getting your animation to save. By moving the highlight layers, we've actually extended the layers beyond the image borders (at least this happened in my case). Gif's do not like this. To avoid a problem later, right-click on each highlight layer in the Layer Dialog Window and choose "Layer to Image Size". This will make each layer fit within the image border. (NOTE: GIMPtalk.com moderator, noclayto, once posted a script on here that would take each layer and automatically resize them to the image size with one click. I don't have the link, but if you're interested in that script, do a GT board search and see if it's still available.)
Step 6We need to eliminate the highlight area outside of the text border. To accomplish this, right-click on the text layer in the Layer Dialog Window and choose "Alpha to Selection". This selects the text. But we don't want to keep the text selected, we want to select everything outside of the text. To do this, hit Ctrl-I or go to the Select Menu and choose Invert.
In the Layer Dialog Window, click on the first highlight layer (the selection will still be in place) and hit the Ctrl-K (delete key) and you'll see the highlight outside of that layer's selection diappear. Do this for each highlight layer.
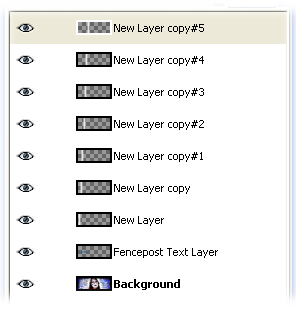
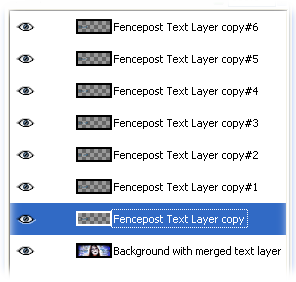
Step 7We now need to duplicate the text layer several times. You need one copy for each highlight layer and one copy to be merged with the background layer in the next step. Then rearrange the layers as shown in the image below. I've labeled them so you can see what I've done. In my example, I already skipped ahead to the next step and merged my background layer with a text layer. In your window, you should have a text layer positioned
above your background layer. Like so:
 Step 8
- Make sure all your layers are turned on (the eye should be showing next to each one)
- Go to the very top highlight layer and merge it down with the text layer below it. Menu item Layer | Merge Down.
- Continue to merge down all of your highlight layers with your text layer. When you get to the bottom, you'll have a text layer above the background layer.
- Merge the text layer with the background.
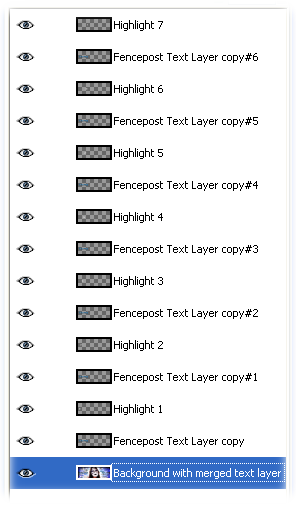
Your layer's should look something like this:
Your animation should now be complete! It's time to try it out....
Go to Filters | Animation | Playback and see how it looks. If you like it, optimize and save it as a gif and you've created something that should look like this:
I know there appear to be a lot of steps, but I like to explain everything as carefully as possible to minimize questions.
I hope you've learned something from this tutorial.
Keep on GIMPing!
Art


