In this tutorial, I will show you how create the following simple animations using my animated path stroke script, which can be found
here>>>>>>:
Fencepost's Path Suite.
The script was updated today (January 28, 2010), so if you had the previous version, please delete it first before installing the updated version. Open the zip file and save the .scm file to your GIMP scripts folder (ie...C:\Program Files\GIMP-2.0\share\gimp\2.0\scripts). Refresh your scripts and you're ready to go.You've can view some other animation possibilities and a brief discussion of other scripts contained within the path suite in this topic:
Animated Path Stroking Topic

While the animations in this tutorial are simple examples of what can be accomplished with the script, the possibilities are great.
Let's Begin!
Step 1Open a new image (200 X 200) with a white layer.
Add a second layer filled with white.
Step 2Add some guides to your image to help with placement of the paths. This isn't absolutely necessary, but I did it for teaching purpose.
Go to Image > Guides > New Guides By Percent...
The following dialog will appear:
Add the following vertical guides (you'll have to add them one by one): 50%, 60%, 80%, and 90%.
Add the following horizontal guides: 10%, 20%, 40%, and 50%.
Your image should now resemble this:
Make sure that Show Guides and Snap to Guides are turned on:
Step 3Select your Path Tool Button

and click at the following locations.
When you get to number 5 hold down the Ctrl key while clicking the mouse button to close the path. The order you place your points is the direction a path moves.
Step 4Let's start our animation!
Activate your top layer by clicking on it in the layer dialog window:
In the brush dialog, select your brush and adjust the spacing as necessary. I chose the Circle Fuzzy (07) and set the spacing to 1.0
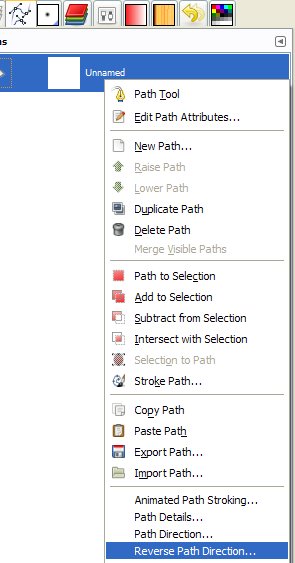
Right-click on the path we just created in the Paths Dialog window and choose Animated Path Stroking...
The following window will appear. I won't cover the all the options in the dialog window (only those we need to use); however, I encourage you to experiment with them later to see what the script can do.
For this animation, we will tell the script that we want to paint on 15 layers (since the second layer of the stack is active, it will start painting on this layer.) The script uses the current active paint tool (in this case the paintbrush) and the chosen brush.
Next, under Paint and Path Options we'll just tell it to paint the individual path segments, but don't add them to the image. If you needed them for later, you could add them, but we don't.
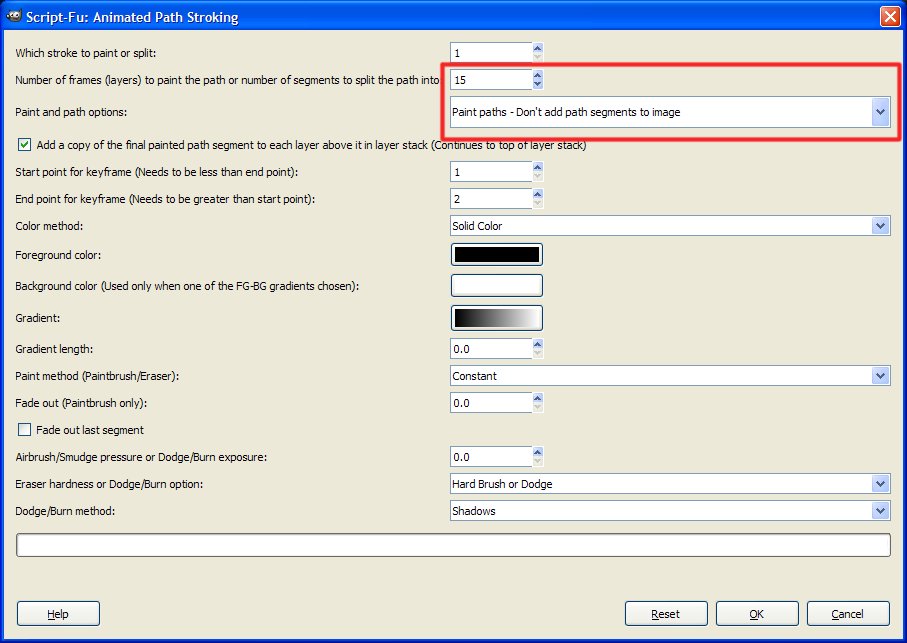
Hit OK.
The following animation should result:
 Step 5
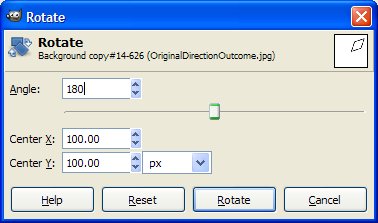
Next, let's rotate our path for petal #2. Double-click the rotate tool and click on the path button, as shown:
Now, click on the image with the rotate tool and enter the following information. Choose OK after you're done.
Step 6With the path rotated, again activate the 2nd layer from the bottom in the layer stack (you should now have 16 layers):
Right-click on the path in the path dialog and run the Animated Path Stroking script again using the same settings as before.
Your outcome should look like this:
Step 7Repeat steps 5 & 6, two more times and your animation should look like so:
Pretty simple, eh?!
Next, let's reverse a couple of the way the petals are drawn. As you may recall, the way a path is drawn is the direction it will be painted. For this animation, we'll use a couple of other scripts included in my path suite, to simplify things a little.Step 1Follow the steps above until you get your first animated petal:
Step 2Add a reversed copy of the path to the image. We already know what direction the original path goes, but what if we didn't know? Right-click on the path in the path dialog and choose, Path Direction...
A dialog will appear, requesting which stroke are you wanting to find the direction of. A stroke is an individual path. A path may contain several individual strokes. However, since we only created on stroke in our path, so leave it at the default of 1. If you choose a stroke number that doesn't exist, the script will give you an error.
A new layer will be added to your image. It will show the direction of the path (green is the starting point and red the ending point.) The script will also tell you if the path is closed or not. Just because 2 ends of a path are right next to (or on top of) each other, does not mean it's closed. Your image should look like this:
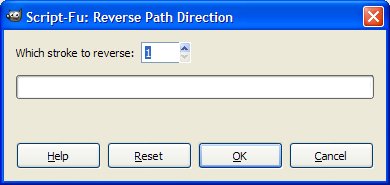
To reverse the direction of a path, you can simply Right-Click on the path and choose Reverse Path Direction...
A dialog will appear requesting which stroke to reverse. Again, there's only one stroke, so click OK.
A new path will be added to the list.
Let's test it's direction (Right-Click on the new path and choose Path Direction...There's only one stroke in this path so leave it at 1 and click OK). A new layer will appear showing that it's been reversed. Remember green is the beginning and red the ending.

Compare it to the other one.
Now delete the two "direction layers" that were added. (Don't delete the reversed path, however.)Step 3Activate the 2nd layer from the bottom in the animation.
Step 4Now, activate the original path in the paths dialog and rotate it 180 degrees using the same method described in Step 5 above.
 Step 5
Run the Animated Path Stroking script using the same settings as before. You should now have this:
 Step 6
Activate the 2nd layer from the bottom as shown before.
Step 7Activate the reversed copy of the path and, using the rotate tool, rotate it 90 degrees.
Step 8Run the Path Stroking script again using the same settings.
Step 9Repeat Steps 6 - 8 one last time (using the reversed path rotated 180 degrees) and your final animation will look like so:
Well, I hope this tutorial has been informative and you learned about some new tools. Make sure you show me your results. Once you understand the techniques, try experimenting with your own paths.
Cheers!
Art


