A new plugin was implemented within GAP that will allow you to morph between two images like so:

The plugin has very little documentation right now, is not always real stable, and no tutorials on it (at least none that I could find). So everything I'm showing you today is based on my 'tinkering'. Please don't ask me to explain the various tools....I probably can't answer your questions! :w: I just don't know.
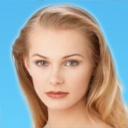
At any rate let's begin. I'm using GAP version 2.1.0 (which is not the most recent version, but it works!) For the sake of following along, please download/use these two images:

Before you begin, you must first, have GAP. Well, duh, you say. May sound simple, but you don't know how many questions I get from people telling me they can't find a certain menu. YOU MUST HAVE GAP! If you don't, you won't have the Video menu. Simple as that.
Additionally, you must know how to work with/create animations in GAP/GIMP. This includes color optimization/indexing, modifying frames to change timing, etc. I WILL NOT cover those topics here. If you need assistance with those steps, you can check out tutorials at GIMPdome.com or elsewhere.
Here we go!!!
- Open up both images in ONE GIMP project. Doesn't really matter which one is the background layer.
- Add an Alpha Channel to the background layer
- Go to the Video | Morph menu (If it's grayed out, you didn't add the Alpha Channel)
The following window will appear:
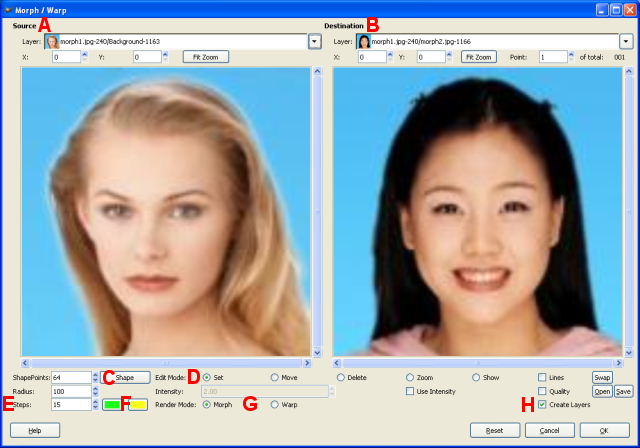
Take a minute to become familiar with the layout. I'll explain what I know and what I want you to know to accomplish this task, but I can't answer anything else. I just don?t know much about this tool.
- Letter A is the Source Window. This is the image we want to begin with. It doesn't matter which image you start with. I'm using the blond. (Hey, I like blondes!)
- Letter B is the Destination Window. This is the image we'll be morphing to. (I like brunettes too! I'm starting to see a trend here!! :w:)
If you want to switch A and B, you can do it through the pulldowns or the SWAP button in the bottom, right-hand corner of the window, will do the trick as well.
- Letter C adds a number of points randomly along the edge of your images to hold the edge in place to keep them from doing strange things. You may have to experiment with this a bit to see if it's necessary or not. The number of points added is shown in the "ShapePoints" box to the left of it. You can change the number as needed. Do this step first as I've heard any control points you add before clicking this button will be deleted.(Thanks to Rimshot at GIMPTalk.com for pointing this out to me!!!)
- Letter D is the number of steps it will take to go from A to B. I've chosen 15 for this exercise. You can experiment with this.
- Letter E will allow you to change the color of the control points, just in case the default colors are difficult to see against your working images. I'll explain control points in a minute. Be advised, I don't know if it?s just my machine, but everytime I click to change the color, the morph tool crashes.
- Letter F controls how what you?re doing to a particular control point. When you placing control points, you?ll be in Set mode. I'm not sure what the purpose of the Move mode is, as I just click on a control point and drag it to a new location. Of course, Delete mode lets you delete a control point you click on.
- Letter G is the two types of morphing functions. I don't know how they differ, but we?ll be using the Morph button, not Warp. I'm sure we'll discover later how these functions work.
- Letter H I've got it checked and I don't know why, but that's what worked for me. Forgive me on this step.
Now, let's talk briefly about control points.
Control points are basically the points we are going to control. I know, I know....you're not allowed to define something using the word(s) you're defining (my 6th grade teacher has just turned over in her grave!) But, that's what they are. With a click of a mouse, I'm going to put a point on the image in the 'A Window (Source)' and one will automatically be placed for me in the 'B Window (Destination)' (Notice the active point is yellow. At least, in this instance). I can fine tune the one in the A Window by clicking/dragging it to the desired location. Now, I can jump over to the B Window, click/drag the point to the desired location.
You may be asking yourself, 'What do you mean by desired location'? Good question, as I stated the points we place are what we're telling the computer to control. In the example below, you'll see a highlighted point in the corner to the blondes' lips. (Aren't her lips pretty?!) Oops, sorry, back on topic..... The corresponding point in Window B is not on her lip. We want to click and drag Window B's corresponding point to a similar location on the face. We want the lips of A to morph into the lips of B.
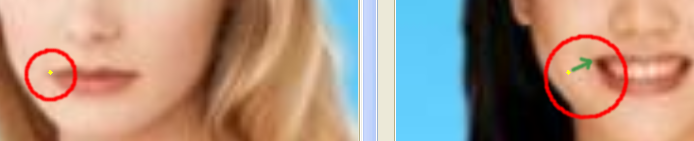
Easy enough.
Now, add as many control points that you feel is necessary to make the transformation. By the way, the number of control points does
NOT correspond to the number of frames your output file will have. Control points only tell the Morph tool how to operate. I believe I had in excess of 50 points for this exercise.
Here's what my final Morph window looked like before I hit ok:
Now, hit the OK button and wait for the magic.
Now, do all the fun things we do in preparing an animated gif: optimize, index colors (if needed), change frame rates, etc. By the way, I saved mine as a gif and reopened it and set the final layers time to 2000 ms (2 secs), so it would have a nice little pause at the end.
This is my result:
I?ve shown you mine. Now, you show me yours!!!
Enjoy and Happy GIMPing!
Art


