In this tutorial, I'll show you how to animate the stroking of a path using GIMP GAP. While this tutorial is basic in nature, the techniques described here, can be used for some very interesting effects (see my animated denim sewing, handwritten text, cool swirl effects, etc.) Please note that I'm not covering ways to reduce the jaggies on the edges, mask utilization for things like the handwritten text, animated sewing, et al. Those things are all easily accomplished, but I believe that some things need to be left up to the imagination. So, prior to providing a critique of the effort described herein, please consider what I've just stated.
This is the very same technique I created for this animation here:
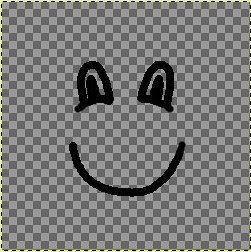
http://img255.imageshack.us/img255/9381/optimizedfinalzq7.gifThe image I will show you how to create, is the one below....
I have attached my working files to the bottom of this post so that you may follow along. However, I will describe what I did, so that you may create your own files.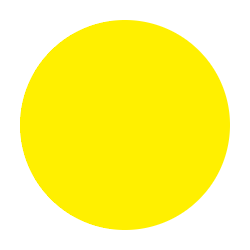
Before you start this tutorial, you'll need to have GAP (the GIMP Animation Package) installed on your machine. If you need to download GAP, Windows users can get it here:
http://gimp-win.sourceforge.net/stable.html and Linux users can get it here:
http://gimp.org/downloads/. Sorry Mac users, there is no GAP for you. :'( Windows users can just unzip the file and double-click the executable file to install. Linux users.....well, you'll know what to do. I haven't a clue.
The board automatically resizes some images, so please right-click on any resized images and choose View Image to see a full-size version.
Step 1Create a 'working folder' and place both the face and brush xcf files in it. This is where GAP will store all of the duplicate files and it's a good way to keep your work organized.
Open up both the face_000001 and brush xcf files from the provided attachment.
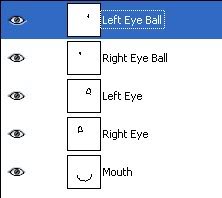
Take a look at the contents of both files. You'll see that the
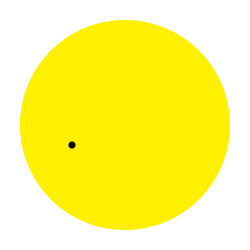
face file has a smiley face background template and, if you click on the paths tab, you'll see 5 paths (mouth, left & right eyes, and left & right eye balls)
When using GAP, you
always have to create the paths in the file that will be duplicated (aka the background file). In this case, I've called the background file: 'face_000001.xcf'. I created 5 separate paths for this exercise, but that's not always necessary. However, I'm not going to address that topic right now, as it's just not needed for our animation. Just follow along using the same values I give until you're comfortable with the steps.
The
brush xcf file contains nothing more than a 'dot' in the middle of a transparent layer.
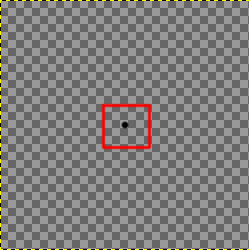
This dot was created with the 7X7 soft-edged GIMP brush. I used a black color and clicked with the brush a couple of times to make it a bit darker. This is what we will use to 'stroke the path' in GAP. When doing your own animations, use a brush size that fits your needs. Also, the brush doesn't need to be round, it can be any shape.
Step 2When using the GAP,
always use the menus from the 'background' file, which, in our case, is the
face_000001.xcf file.
With both the face and brush xcf files open, go to the make your face window active, click on the Paths Dialog, and select the first path to stroke. I've started with the mouth as shown (you must select the path for the steps to work):
 Step 3
Next, we need to duplicate the background. This step is tricky as you never know how many layers it will take to complete the animation. You always have to take into consideration the size of the brush, the length and numbers of paths you're stroking, etc. Because you're using my xcf files, I've already done the leg work and calculated all the information for you. Once you do this on your own, you'll be....well, on your own!

On the
face window, go to Video Menu > Duplicate Frames....
and enter the following values:
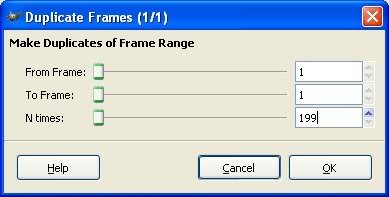
This will create 199 duplicates of the face (background) file. Sometimes the number of duplicates you end up needing can be extremely large. My Mickey animation was over 1200+ frames!
Step 4Next, on the
face window, go to Video Menu > Move Path
and enter the following values (I'll explain what's happening below the screenshots):
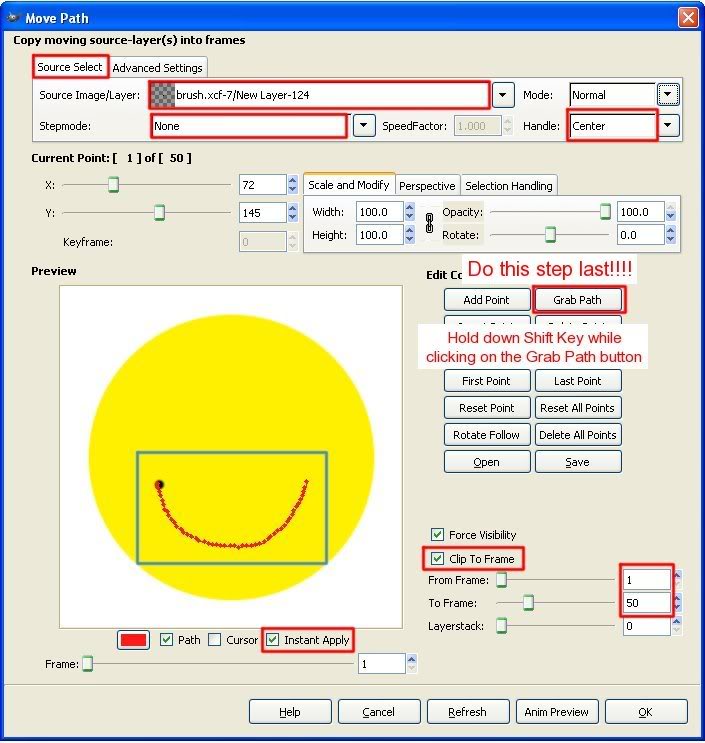
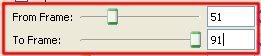
In the first screenshot, we're telling GAP that we want to add the brush layer to our background layer. If you notice the From Frame and To Frame section near the bottom right of that window, you'll see that we're going to add this brush, from frames 1 to 50.
Do this step last!!!! See the Grab Path Button? When I told you to select the mouth path in Step 2, if you click on this button, it will automatically use the selected path as the path to follow.
BUT, before clicking that button, we want GAP to fill in the gaps of the path. To do that, hold down the Shift Key while clicking the button.
So, if you take a look in the blue highlighted box in the preview window, you'll see a bunch of red dots and one black one representing the brush. What we've done here is tell GAP to add our brush layer to frames 1 to 50 along the chosen path. How did I know to use 50 frames? It was trial and error....mostly error!
I want my brushes to be added close enough along the path to look like a continuous stroke. If I use to few frames, they won't touch. Too many frames and you're just wasting frames and adding to the file size. So, it's one of those things you have to experiment with for each animation.
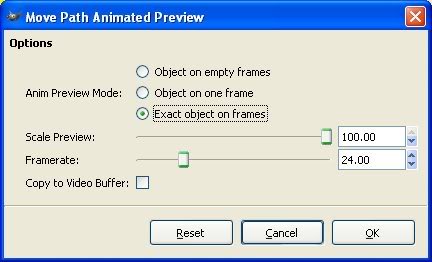
One more step....click on the Advanced Settings tab as shown below and change the parameters of the Tracelayer option. This option takes the first layer and gives it a trace opacity (its transparency, if you will) and then it duplicates that layer and gives the duplicate another trace opacity setting. This is typically used for adding the appearance of a fading effect if you set the opacity of the TraceOpacity2 setting below the value of the first. However, we don't want a fade, we want a solid line. So, set both boxes to 100 as shown.
NOTE: The Trace Layer step isn't entirely necessary for the way I've set up this particular example. However, there are cases (and I'm not going to explain them right now) where using this feature is necessary. Those cases appear to be more advanced than this tutorial so, as I said, I'm not going to cover them now. I suggest you use the Trace Function so you can become familiar with it and learn how to use it in other ways by adjusting the opacity settings.Now, once you're confident that you've got the settings set properly, click on the Anim Preview button

at the bottom of the Move Path window to see the first part of the animation. Enter these values:
and you're animation should resemble this so far:
Close down the animation preview
and the
Untitled animation file that was created for the preview and DO NOT SAVE it.
Back in the main Move Path window, click the OK button

at the bottom to accept the changes.
Essentially, you now have all the tools to complete this animation on your own. However, I think it would be unfair for me to leave you to figure out the settings from here, so I'll give you the final steps!
Step 5Go back to the
face xcf file and select your next path in the list (Right Eye), like so (since these steps are now just repetition, this will be the last screenshot for choosing the path):
 Step 6
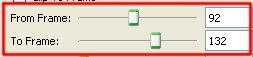
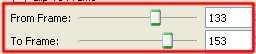
Go to Video Menu > Move Path and reset the settings to those shown exactly as before, but this time set your From and To settings to the following:
Once you're confident your settings are correct, click on the OK button to accept.
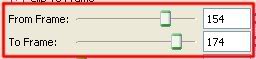
Repeat Steps 5 and 6 using the following From / To settings....Make sure you select a new path each time AND when before you click the Grab Path button, make sure you hold down the Shift key.
Left Eye Path uses these settings:
Right Eye Ball Path uses these settings:
Left Eye Ball Path uses these settings:
 Step 7
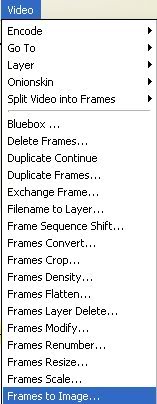
Now, let's convert our frames to an image. On the face window, go to Video Menu > Frames to Image....
and enter the following settings:
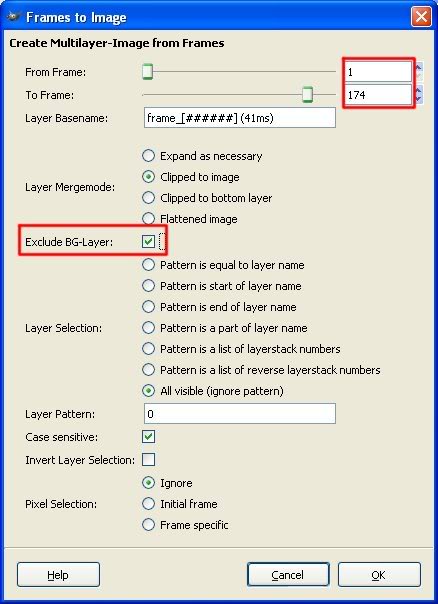
Notice that we're only using 174 of the 200 frames we created. Also, I've checked the box to Exclude the BG-Layer. What this will do is remove the smiley face template (the yellow circle) from all frames. Why are we doing this? Because the way we did the animation in steps, if we didn't delete this layer, you would see the mouth being drawn on frames 1 to 50. Then the mouth would disappear and the right eye would be drawn, then disappear. We'll add it back in in just a minute.
Once you've changed the settings as shown, click OK.
GAP will churn for a little while compiling all the layers. Here's a single screenshot showing all of the layers turned on:
If you want to watch your animation, go to Filters Menu > Animation Playback.
Step 8Click on the bottom layer of the animation layers and then go to your
face file again and select the smiley face template as shown...
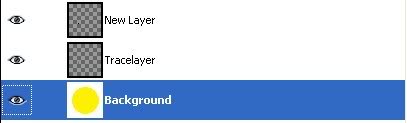
Drag and drop the smiley face template to your animation layers and move it to the very bottom of the stack. Double-click on the bottom layer and add a delay in the timing like so:

1000ms = 1 second. This layer will delay 1 second before moving to the next.
Now, go to the very top layer and change its timing as well. I've added a 1 second pause to this layer....
 Step 9
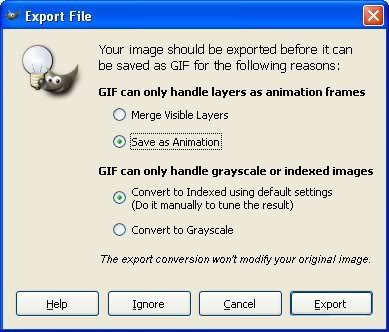
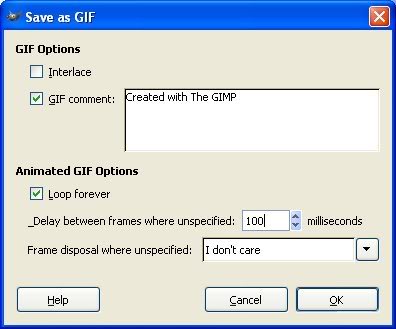
Lastly, save your animation as a gif file. File Save or Save As...
Use the following settings:
And, you should now have an animation that looks like this:
Let me know if you have any questions or comments.
Cheers!
Art


