This is an oldie, but a goodie! I'll be rewriting this soon to incorporate new techniques and also a GAP version. However, it still should function properly with the steps listed below. I've just learned more about GIMP since I first wrote it! Enjoy!
In today's lesson, I'm going to show you how to make an animated flag that looks something like this:

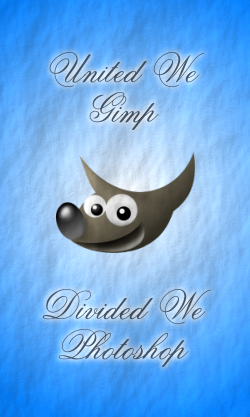
You can use your own flag if you'd like; however, if you'd like to follow my steps exactly, you can save my GIMP flag to your hard drive and open it in GIMP.
In this lesson, we're going to use the bump map, displace map, and layer transform tools to work some serious magic. Oh, I almost forgot, we're gonna make some noise too!
Depending on how many layers you want in your final image, there can be a lot of steps to go through. Fortunately for all of us, the steps are very repetitive. Once you get a system going, you won't believe how easy this is. :l:
Please note that because the steps are repetitive, I will only be showing the images once. You'll be able to follow along with no problem.
This tutorial can be accomplished by even a newbie. But, I will add this: I'm not going to be addressing opening up an image, adding new or duplicating layers, saving as an animated gif, etc. So, if you're not comfortable with those particular steps, you might want to learn those tasks prior to undertaking this tutorial.One last thing, this animation is for flags that hang vertically. If you desire to make them wave horizontally, the process is very similar, but the settings for some of the filters will differ.
Without further ado, let's begin.
Open your flag image in GIMP.
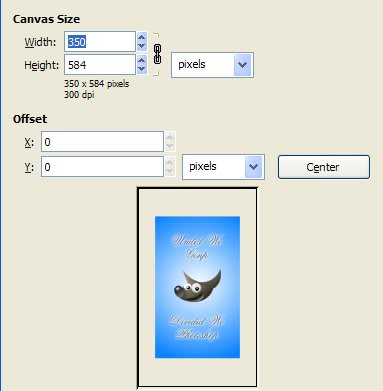
Because we're going to be distorting the image a bit, we need some extra space to work with. Let's modify the Canvas Size. Here's the menu location:

and here's the settings I've used. You can use anything you want, just give yourself a bit of extra space.
The flag image I've posted for your use is a png. It contains an alpha channel. After modifying the canvas size, if your flag doesn't have a transparent background, you'll want to add an alpha channel to the image (right click on image layer and select "Add Alpha Channel")
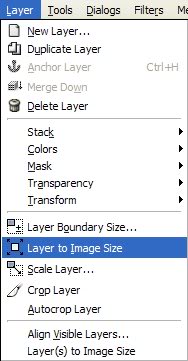
Now, for our displace map filter to work later on we'll need all layers to be the same size. To make things simple, make your flag layer the same size as the canvas:
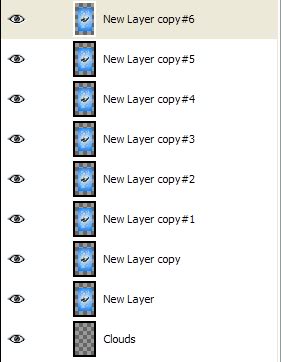
Duplicate this layer as many times as you want. Just remember, you'll have to manually repeat the some steps for each flag layer you add. Fortunately, this isn't hard, just tedious. While you're at it, let's add a new layer, rename it clouds, and drag it to the bottom of the stack. For my image, I have 8 flag layers and one cloud layer. My layers look like this:
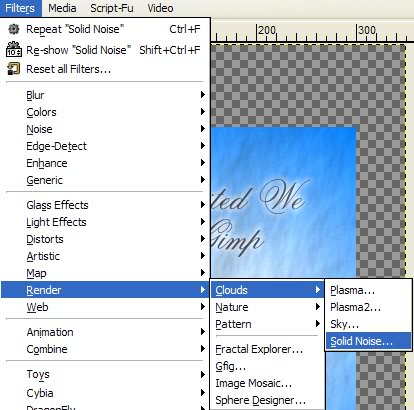
Now, highlight your cloud layer and let's add some Solid Noise. You can access the Solid Noise Filter here:
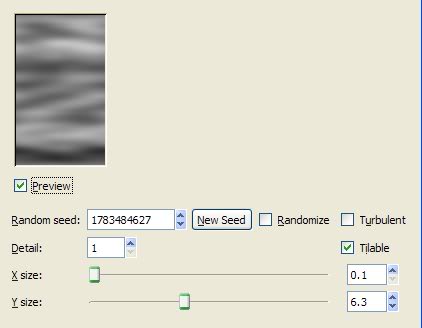
Here are the settings I've used. You can use anything you want, but what I wanted was something that had some wide horizontal lines ("waves") to it. Note that I've checked the "tilable" button. This is really cool! I figured out a neat tool that will really save us some steps later on.
One thing I didn't show you was that I also added a Gaussian Blur and Curves adjustment to the Clouds layer. The blur reduces the amount of noise in the Bump Map portion of the tutorial and the Curves adjustment gave me more contrast for the Displace Map filter. You can experiment with the blur and curve adjustment if you want, but I won't cover them here.
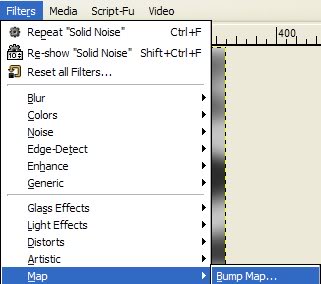
Now, make your first flag layer active and let's bump....bump map that is!
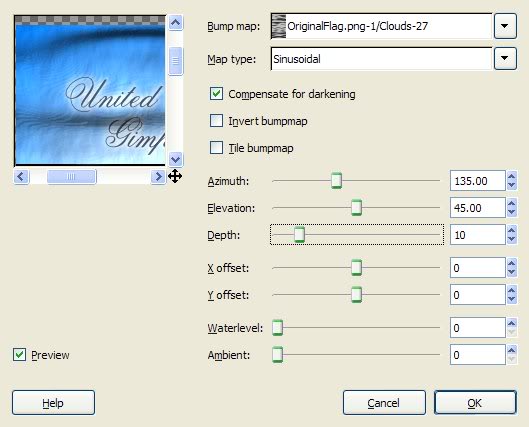
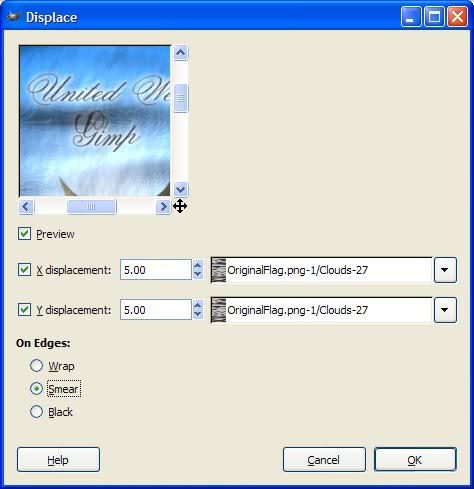
Here's my settings. Make sure you use the clouds layer as the bump map layer. Experiment with various settings, using whatever works for you.
On the same flag layer, go to the Displace Map Filter:
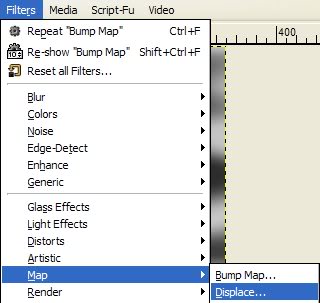
Use your clouds layer as the displacement layer and experiment with the settings. Try to get a good balance. Using too high of numbers will distort your flag too much and the result won't look real.
So, how are you doing so far? Well, guess what? I've got one more Really COOL step to show you and you're nearly done!
When I first started figuring out the steps to accomplish this, I kept redoing the solid noise. But my final animation didn't "flow" as much I wanted it to. Everything was a little too random for my tastes. Well, I remembered a tool we haven't discussed around here for a long time that gave me the results I was after. It's called the Layer Transform Offset tool. You can locate it here.
Before you go looking for it, make sure your Clouds layer is active. This is the one we want to transform.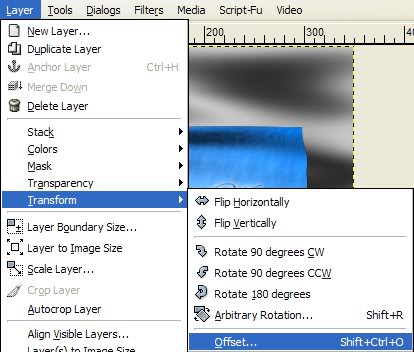
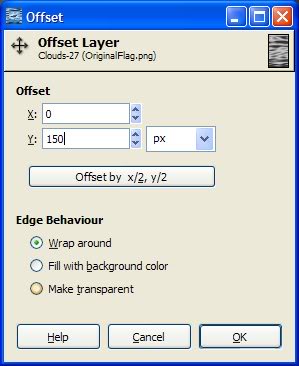
What we want to do is move the Clouds layer down after each bump map/displace map step to make the flag look like it's flowing. Remember when I told you to check the "tilable" box in the Solid Noise Dialog? This will allow our Clouds layer to move along the Y-Axis in a seamless fashion! COOL BEANS!
Modify only the Y setting only. I chose a number above 100 to move it quite a bit and each time I did this step I randomly selected another number over 100. Again, nothing is in stone, experiment and see what you come up with. Choose OK
Now, go to your next flag layer and redo the bump map and displace map steps. Make sure you do the bump map first. I used the same bump/displace map settings everytime. You can change them, but for me, it was a lot faster to leave the settings alone.
Now, repeat the Transform Layer Offset on the clouds and redo the bump/displace map steps for each layer until you are finished.
Once you done, delete the clouds layer, test your animation (Filters | Animation | Playback), and save as a gif. When the dialog box comes up, choose "One frame per layer (replace)" under the "Frame disposal where unspecified" box. If the size of your animation is too large, try opening your gif in GIMP and then go to Image | Mode | Indexed and try reducing the number of colors there. optimize your animation (Filters | Animation | Optimize for GIF), and save as a gif.
Again, here's my final image:
How did you do?
I'm looking forward to seeing your results.
Happy GIMP-ing!
Art


