In this tutorial, I will show you how to quickly create these two border highlight animations using a couple of different GIMP scripts. I used GIMP 2.6.7 for this tutorial. The images we will be creating will look something like so:
In order to complete the tutorial, you will need the following scripts:
FP's Move LayerFP's Polar Coordinates Space TunnelSaulgoode's Apply MasksSaulgoode's Combine BackgroundSaulgoode's Animation SettingsDownload the scripts and place them in your GIMP scripts folder (ie...C:\Program Files\GIMP-2.0\share\gimp\2.0\scripts). Refresh your scripts and you're ready to go. I'll provide the menu locations at the appropriate time.
The steps are pretty easy, but I've included a LOT of screenshots so that newb's can follow along. Let's begin!
Step 1Open up the image you want to add the highlight to. I'm using a sig I created quite some time ago.
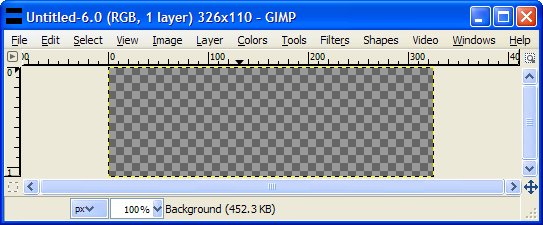
We will not be using this image until the very end. Everything will take place on the transparent image we're creating next.Open a second image with a single, transparent layer the same size as your first image.
 Step 2
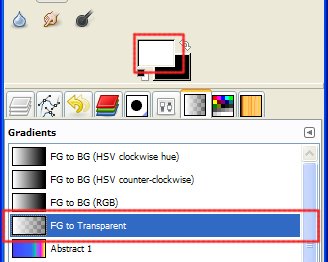
Set your foreground color to white and under the gradients tab, choose FG to Transparent, like so:
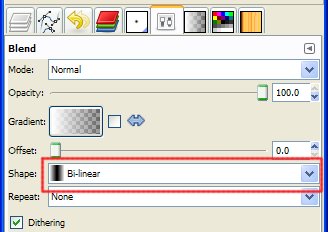
Next, set the Blend mode for the gradient to Bi-linear.
Now, on the image with the
transparent layer, take the gradient tool and create a highlight similar to my image below. Start somewhere near the green dot on my image and, while holding down the Ctrl key (restricts the tool to a straight line), drag the tool to somewhere near the red dot. (This is our highlight layer). Note: the red and green dots will not be on your image. They are guides only.
Now, add a blur to the highlight. Filters > Blur > Gaussian Blur... Here's my settings. Use whatever looks good to you.
Step 3Next, grab the rectangle selection tool (
) and create a selection on the transparent layer similar to this. I believe I started mine 15 pixels from the top and ended at 15 pixels up from the bottom. Again, choose whatever looks good to you.
Step 4Next, we're going to add a mask to our transparent image. Everything black will be completely hidden, everything white will be allowed to show through fully, and the in-between shades of gray will show the image somewhere in the middle, with grays closer to white showing more and grays closer to black showing less.
Right-click on the transparent layer and choose Add Layer Mask...
A dialog box will appear. Choose the following settings:
Your image should now look something like the image below. Notice that there's a green line around the image border. This lets you know the mask is active. Anything you do to the image at this point will only work on the mask.
Another way to tell if the mask or the actual layer is active, is to look in the Layer Dialog window. Notice the white line around the mask, this means the mask is active. A black line surrounds the layer meaning the layer is inactive. To make the layer active, just click on the layer preview image in the layer dialog window. To make the mask active, click on the mask preview.
For this step, make sure the mask is active.Here's an image showing the layer being active.
Step 5The mask currently creates a "hard edge" on our highlight, where it abruptly goes from white to black. Let's soften that up a little bit.
With the mask active, go to Filters > Blur > Gaussian Blur... and set the settings to something like so:
Your highlight should look a bit softer now.
Step 6Now, make the layer active by clicking on the little layer preview in the layer dialog window.....
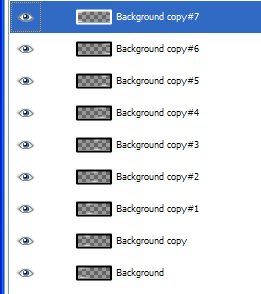
Let's animate the layer. Go to Filters > Animation > Move Layer... and the following dialog will appear. Choose the following settings (adjust to your liking) and hit OK.
A series of layers will appear like so:
Step 7Before we can finalize our animation, we need to "attach" or apply the masks to each layer. We could do this by hand, but with saulgoode's apply mask script, we don't have to. The script will do it automatically for us. Go to Layer > Mask > Apply Masks on Visible Layers (make sure all your layers are visible). The script will make quick work of the apply process and your layer dialog should now look something like this:
 Step 8
Next, we need to add our background to our animation. Click on the image containing the background and click/drag the background layer over to our highlight image....
Once the background layer is copied over, click on it in the layer dialog window and drag it to the bottom of the stack.
Step 9We need to combine the background layer with all of the highlight layers. Again, this could be done manually, but saulgoode's combine background script will quickly do it for us. Go to Filters > Animation > Combine Background
Once the script runs, delete the very bottom background layer as it's just a copy and is no longer needed. Your animation is now ready. Go to Filters > Animation > Playback to see what it looks like. If you want to adjust the timing, go to Filters > Animation > Animation Settings and adjust the settings to your liking. Save as an animated gif. Your final product should resemble this:
Pretty easy, huh?!
Let's create our second version, which looks like this:
We only really need to modify a couple of things. I won't redo all the steps as I explained them above. However, I will explain what needs to be changed.
Repeat Steps 1 and 2 above.
When you come to Step 3, select the whole image (Ctrl+A or Select > All).
Next, shrink the selection by going to Select > Shrink... and enter the desired settings. Here's what I used:
Repeat Steps 4, 5, and 6.
Before applying the masks to the layers, go to Filters > Animation > Animated Polar Coordinates... This will twist the highlights.
Repeat Steps 7, 8, and 9.
Your animation should look something like this....
Well, there you have it. Hope you learned something new and had fun creating an animated border highlight. Let me know if I was unclear with my instructions. Make sure you show me your work. Enjoy and happy GIMPing!
Art


