Just posted a re-write of the Animated Border Highlight tutorial I posted at GIMPtalk.com awhile back. Here's what you'll be creating:
In this tutorial, I will explain the steps to create an animated border highlight that you can use on your signatures and avatars, like this:
Although you should have some familiarity with GAP, I will try to explain everything in enough detail to help a GAP newbie complete this project. This animation could certainly be done in GIMP without GAP, but you might want to only try it on avatars or objects of much smaller size than typical signatures. GAP is so much more efficient; however, not everyone likes GAP and MAC users don't have the luxury of GAP at all.
Step 1:Open up the sig you want to add the highlight. I'm using this one, which was a gift from gimpbattledome.com member, Watup! If you're using the xcf file of an existing sig, I recommend that you save it as a new xcf file and merge all the layers together so that you're only working with one layer.
(Remember, make a new animation folder to store all the xcf files that GAP will create)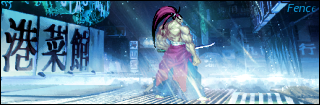
If your background layer name is bolded, right-click on it and choose "Add Alpha Channel". This will insure that your image can have transparency. It's not absolutely necessary for this tutorial, but it's a good tip regardless.
Step 2:Select the contents of your layer (Select | All). You will have a moving grid along the outside edge of your layer. This grid is also known as "marching ants."
Step 3:Shrink the selection by a few pixels (Select | Shrink....I used 3 pixels, but you use whatever you need.) This will be our border.
 Step 4:
Cut and paste this selection as a new layer. You'll now have 2 layers. This next graphic shows my results:

To keep things straight, I renamed the layers as so. It's not necessary, but you may need to do it the first time to keep things in order:
 Step 5:
Save this background layer in the animations folder as xxxx_000001.xcf (replace the xxxx with your chosen name). Leave this layer open.
Step 6:With the background layer still open, create a new,
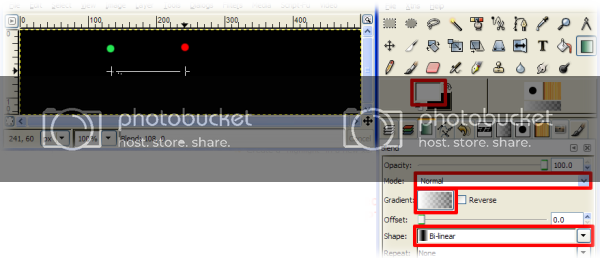
transparent document (File New or Ctrl+N) with the same dimensions as your background. On this layer, create a highlight using the gradient tool and the settings shown below. The green and red dots are only there as a guide. Just drag your gradient tool in one direction or the other.
Tip: Holding down the Ctrl key at the same time you apply the gradient, will keep the gradient in a straight line. Your gradient doesn't have to be the same size as mine. Experiment.
This will be your result:
 The reason you see a black background in the above two screenshots is so that you know a white highlight has been added. Because the background page is white, you wouldn't be able to see a white highlight. Yours should actually be transparent.
Step 7:Save this document to your animations folder using a name like "highlight.xcf" The naming of this image must be different than that for the background because GAP is going to use the background image as a base and create several duplicates of it.
From here on out, we will be using the GAP plugin.
Since we will be using the background_000001.xcf file as a base, you must use the menus within the background_000001.xcf. Applying the menus from within the highlight.xcf layer will cause many problems.Step 8:With both of your xcf files open (background_000001.xcf & highlight.xcf), click on the
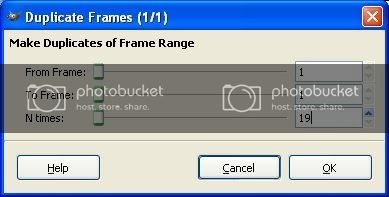
background_000001.xcf file's Video menu and choose the Duplicate Frames Option.
If you do not see the Video menu, you do not have GAP installed. In the Duplicate Frames Window that opens, set the "N Times" number to 19. This tells GAP to make 19 copies of the background layer. If you look in your animation folder, you'll see a total of 20 background files and the highlight layer. Now do you see why I told you to create an animation folder? LOL!
You can actually open up anyone of the background files as we move through the process to see what's happening. Just make sure you close it before doing any of the other steps so that you don't inadvertently work on the "wrong" background layer.
Step 9:Now, again in the background-000001.xcf file, go to Video | Move Path. The first thing I want you to focus on is the settings up at the top and the "Layerstack" number (bottom right-hand corner). I won't be explaining what the settings do, but the "Layerstack" setting of 1 tells GAP to sandwich the highlight layer between the sig inside & sig outline layers.
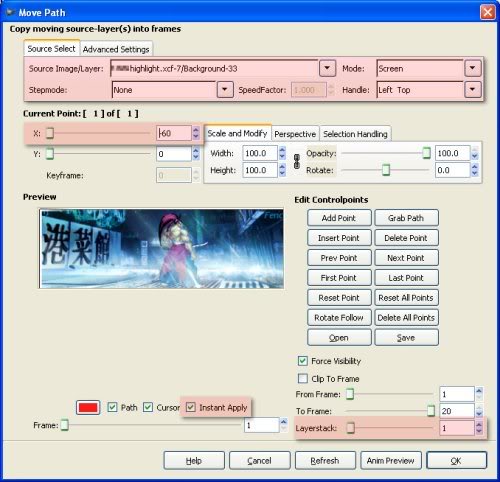
Now, to move the highlight across the sig, we need to add 3 points.
1. In the "X:" Box, I used -60. Y
ou use whatever you need to set your highlight at the left edge). Now click the Add Point button under the Edit Controlpoints section of the Move Path Window. 2. In the "X:" Box, I used 250.
Again, You use whatever you need to set your highlight at the right edge). Now click the Add Point button under the Edit Controlpoints section of the Move Path Window. 3. In the "X:" Box, I used -60.
You use whatever you need to set your highlight at the left edge). Now click the Add Point button under the Edit Controlpoints section of the Move Path Window.
What this does is tell GAP, to move the highlight across the entire image and back in a period of 20 frames. Right now, GAP has done nothing to the frames. We've just told it what we'd like it to do. Or, at least what we'd "think" we'd like it to do. Before we proceed, let's check out the animation and see if it's gonna do what we want it to.
Step 10:Click on the Animation Preview button at the bottom of the Move Path Window. I generally change the settings there to "Exact object on frames" (This shows exactly what's gonna happen) and the Scale Preview to 100 (Makes the Animation Preview the same size as the original). Select OK and preview it.
When you're finished with the preview, close the preview
and the new Untitled GIMP animation window that was created when you opened the preview window. Don't save the Untitled GIMP animation.
If you're happy with everything, click the OK button in the bottom right-hand corner of the Move Path Window. If you need to make changes, click the Delete All Points Button in the Edit Controlpoints section of the Move Path Window and redo
Step 9 A-C.
You really don't have to Delete all of the points, you can delete individual points using the keys in the Edit Controlpoints section, but I'm not converting that here. You can experiment with those keys on your own.
Upon making the desired changes, redo
Step 10 again until you are satisfied with the results.
Once you're satisfied, click the OK button at the bottom of the Move Path Window. GAP will now add the highlight to each of the 20 background_xxxxxx.xcf files that were created. However, you'll only see one because you've only got the one background layer open. You could pick any one of the other background files in the animation folder and open it to see what's happened. Just make sure you close it before proceeding.
Step 11:Right now, you don't have an animation. You have an xcf file that contains 3 layers. If you were to go to Filters | Animation | Playback, GIMP would cycle through these 3 layers only and you certainly wouldn't see what you observed in the preview animation in Step 10. However, we do have all the files we need to make the animation. We've just got to tell GAP to do it!
On the background_000001.xcf file, go to Video | Frames to Image. For our purposes, the only thing we need to change at this time is under the "Layer Basename:" Section. If you want to adjust your time (the default is 41 ms), just insert a new number in the parenthesis.
I used 100ms for mine. The larger the number, the longer the delay between frames. Half a second is 500 ms; 1 second is 1000 ms; 2 seconds is 2000 ms, etc.
Choose OK.
A new window will and, as you will notice, there will now be 20 layers. GAP has taken every xcf file and combined them into 1 xcf file ready to be made into an animation!
Now, there are some things you could do if you want at this point, like delete a few of the frames toward the end of the animation. For some reason unknown to me, GAP exactly completes the animation in less than 20 frames and then pads it at the end with duplicates of the final layer. You can also change the times of the individual layers by double-clicking on the layer and replacing the number in front of the xxxx ms. There is a way to do it through GAP so it doesn't have to be done manually, but that is beyond the scope of this tutorial.
Finally, on the new Untitled document that GAP created, you can save it as an animated gif. (File | Save As). You may need to optimize your image prior to saving to reduce the file size. This can be done by going to Filters | Animation | Optimize (for gif). However, in some cases, this might leave some ugly artifacts on the animation. If this is the case, don't optimize yet, Just save as a gif. You can always reopen your gif and choose Image | Mode | Indexed and reduce the number of colors there to reduce file size. Experimentation is the key!
Here's my final image:
Well, I hope this tutorial has been enjoyable and that you've been able to add a new tool to your GIMP arsenal. Let me know if you need clarification on anything.
Keep on GIMPing!
Art


